

[adinserter block=”3″]
Getting the “ERR_CONNECTION_REFUSED” error when you’re trying to visit a website can be really annoying. This happens because your web browser is having trouble connecting to the server that holds the website you want to see. In this guide, we’ll figure out why this error occurs and give you simple solutions to help you get back online quickly.
What is ERR_Connection_Refused in Web Browsers?
The “ERR_CONNECTION_REFUSED” error is a specific error code that users encounter when attempting to access a website through their web browser. This error is generated by the browser when it is unable to establish a connection to the web server hosting the requested website. The error message essentially informs the user that the server is refusing the connection.
Causes for the “ERR_CONNECTION_REFUSED” error:
- Server Unavailability: The most common cause is that the web server itself is unavailable. This unavailability could stem from various reasons, such as routine maintenance, high server traffic, or unexpected server issues. In such cases, users may have to wait until the server becomes accessible again.
- Firewall or Antivirus Settings: Local firewall or antivirus software on the user’s computer may be configured to block certain connections. If the security software perceives the website as a potential threat, it might refuse the connection. Temporarily disabling the firewall or antivirus can help identify whether these settings are causing the problem.
- Incorrect IP Address or Port: Misconfigurations on the server side, such as an incorrect IP address or port number, can lead to connection refusals. It’s essential to verify that the website’s server settings are correctly configured to accept connections.
- Browser Cache or Cookies: Corrupted browser cache or cookies can sometimes interfere with the connection process. Clearing the browser’s cache and cookies can eliminate these potential conflicts and might resolve the “ERR_CONNECTION_REFUSED” error.
- Network Issues: Problems with the user’s network, including issues with the router, ISP (Internet Service Provider), or local network disruptions, can contribute to connection problems. Troubleshooting the network and restarting the router may be necessary to address these issues.
What happens when a site refuses to connect?
When a website refuses to connect, it means that your web browser is unable to establish a connection to the server hosting the requested site. This situation can occur for various reasons, and the result is typically an error message displayed in your browser. The most common error message associated with this issue is “ERR_CONNECTION_REFUSED.” Here’s what happens when a site refuses to connect:
- Browser Error Message: When your browser encounters a connection issue, it generates an error message indicating that the connection to the website has been refused. The exact wording of the message may vary depending on the browser, but commonly used messages include “ERR_CONNECTION_REFUSED” in Google Chrome or “Unable to connect” in Firefox.
- No Page Content: Since a connection is not established, the browser is unable to retrieve the web page content. As a result, you won’t see the actual content of the website you were trying to access.
- Possible Reasons for Refusal: The refusal to connect can be caused by various factors, such as server unavailability, firewall or antivirus settings, incorrect server configurations, network issues, or DNS problems. The specific error message may provide additional details or hints about the underlying cause.
- User Actions: Upon encountering a connection refusal, users may take certain actions to troubleshoot the issue. This can include checking their internet connection, ensuring the website’s server is operational, clearing browser cache and cookies, and temporarily disabling firewall or antivirus software to see if they are causing the problem.
- Impact on User Experience: The refusal to connect affects the user experience by preventing access to the desired website. Users may experience frustration and inconvenience, especially if the website in question is critical for their tasks or activities.
- Troubleshooting: Users and administrators can troubleshoot the issue by examining the error message, checking server status, reviewing network settings, and verifying the correctness of the URL. Depending on the identified cause, appropriate steps can be taken to resolve the connection refusal.
How to fix the refused to connect error in chrome?
1. Check the Status of the Website
- Open your preferred web browser.
- Enter the URL of the website you want to check in the address bar.
- Press “Enter” or click on the “Go” button to attempt to access the website.
- Note any error messages displayed by the browser, especially “ERR_CONNECTION_REFUSED.”
If the issue persists, try accessing the website using a different browser (e.g., Chrome, Firefox, Edge, Safari).
- Use online tools like Website Planet or Down for everyone or just me to check the status of the website. If these tools indicate that the site is down, it may be experiencing server issues. If website appears to be up for others, contact the website’s support or administrator for assistance.
2. Restart Your Router
- Identify the physical router device in your home or office.
- Use the power button or unplug the power cable from the electrical outlet.
- Allow the router to completely power down; indicator lights may turn off.
- Confirm that all indicator lights on the router have turned off.
- Wait for about 10-15 seconds to ensure a complete reset.
- Turn the router On using the power button or by plugging in the power cable.
- Allow the router to initialize; watch for indicator lights to turn on and stabilize.
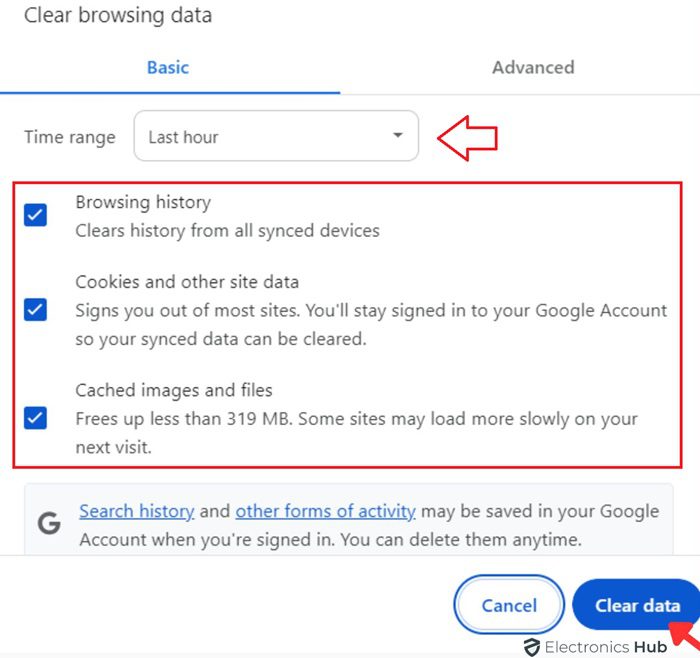
3. Clear Your Browser’s Cache
- Open Your Browser
- Look for the settings menu (usually three dots or lines).
- Find and Click on “Browsing data” or “Clear browsing data.”
- Check “Cache” and “Cookies and Site Data”
- Click “Clear”
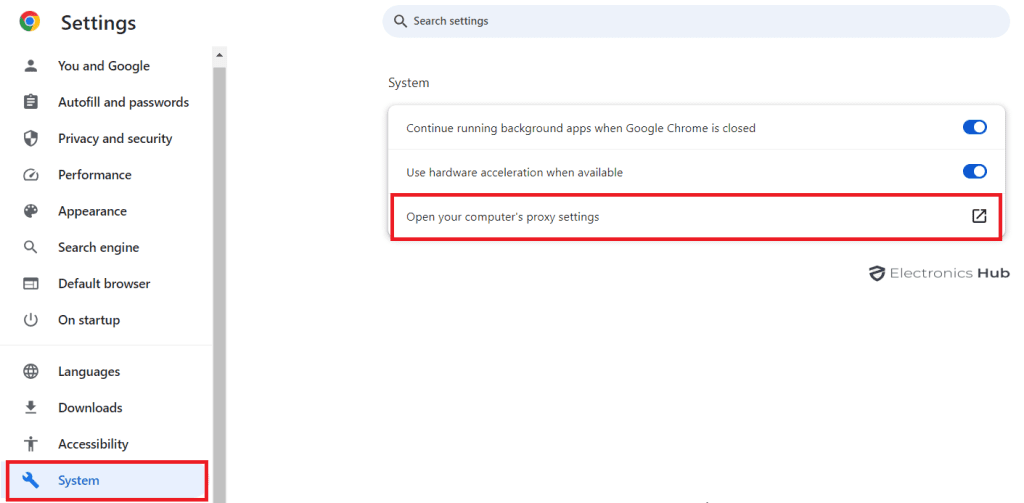
 4. Assess Your Proxy Settings
Proxy servers are like online bodyguards, helping you surf the web with a different identity. They stand between your web browser and the websites you visit, keeping your identity safe and managing how data is stored and shared.
But sometimes, using a proxy server can cause a problem called “ERR_CONNECTION_REFUSED.” This happens when the website you’re trying to visit doesn’t like the identity your proxy is using, or if the proxy isn’t working right.
To fix this issue, especially for those using Google Chrome, follow these simple steps:
- Click on the three dots in the top right corner and select “Settings.”
- Click on “System” Option.
- Look for “Open proxy settings” and click on it. This takes you to the place where you can adjust your proxy settings.
- If you use Windows, click on “LAN Settings” and uncheck the box that says “Use proxy server for LAN.”
5. Disable Firewall and Antivirus Software Temporarily
Antivirus programs can sometimes disrupt internet connections, leading to the ERR_CONNECTION_REFUSED error. To check if your current antivirus is causing this issue, you can temporarily disable it, though this is not recommended due to potential risks. Proceed only if you understand the risks and have a system backup.
Here’s how to temporarily disable your antivirus:
- Right-click on an empty space in your taskbar and select Task Manager.
- Switch to the Start-up tab using the header menu.
- Locate your antivirus application in the list and click on it once to select it.
- Click on the Disable button at the bottom-right of the window. This prevents the antivirus from launching on startup.
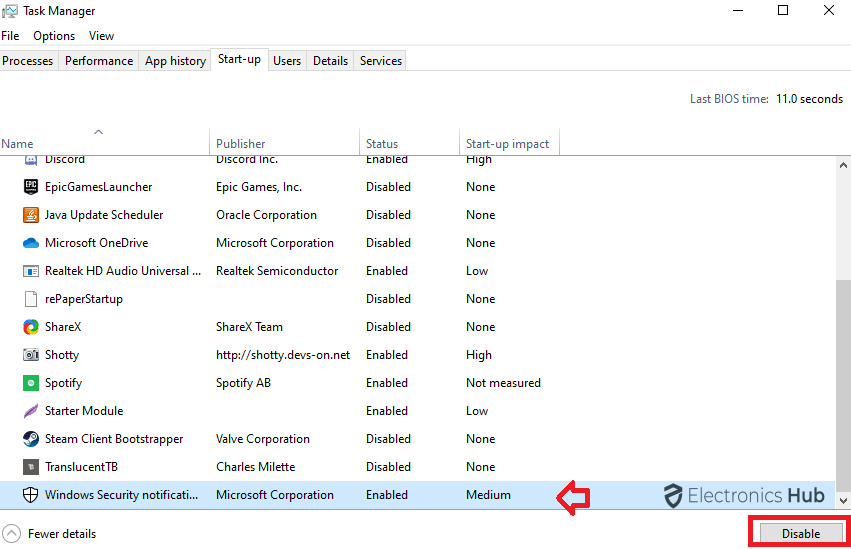
Restart your computer and use Google Chrome to check if the ERR_CONNECTION_REFUSED error persists. If it doesn’t reappear, your antivirus may be the likely cause.
Remember, this method is not recommended for long-term use as it leaves your computer vulnerable. Only proceed if you’re aware of the risks and have a backup to revert any potential damage.
6. Remove DNS Cache
- Press the Windows key + X to open the Power User menu.
- Select “Command Prompt (Admin)” or “Windows PowerShell (Admin)” to open the command prompt with administrative privileges.
- In the Command Prompt or PowerShell window, type the following command and press Enter:
ipconfig /flushdns
- Wait for the command to execute and for the system to confirm that the DNS Resolver Cache has been successfully flushed. You should see a message stating, “Successfully flushed the DNS Resolver Cache.”
- After receiving the confirmation message, you can close the Command Prompt or PowerShell window.

7. Turn off Google Synchronization
Go to settings, Select on Sync and Google Services.
And Click on Turn OFF button to stop synchronization.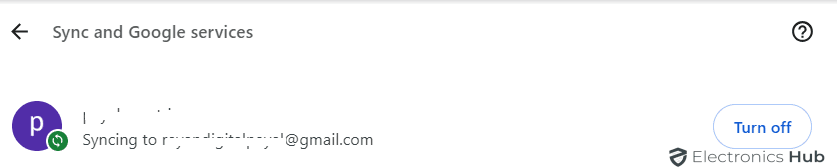
8. Remove Extensions
Removing browser extensions can potentially help resolve the “ERR_CONNECTION_REFUSED” error. Extensions, while useful, can sometimes interfere with network connections or conflict with certain websites. Here’s how to remove extensions in common browsers:
Google Chrome:
- Open Chrome and click on the three dots in the top-right corner to access the menu.
- Select “Extensions” a drop down will appear and select Mange Extension Option.
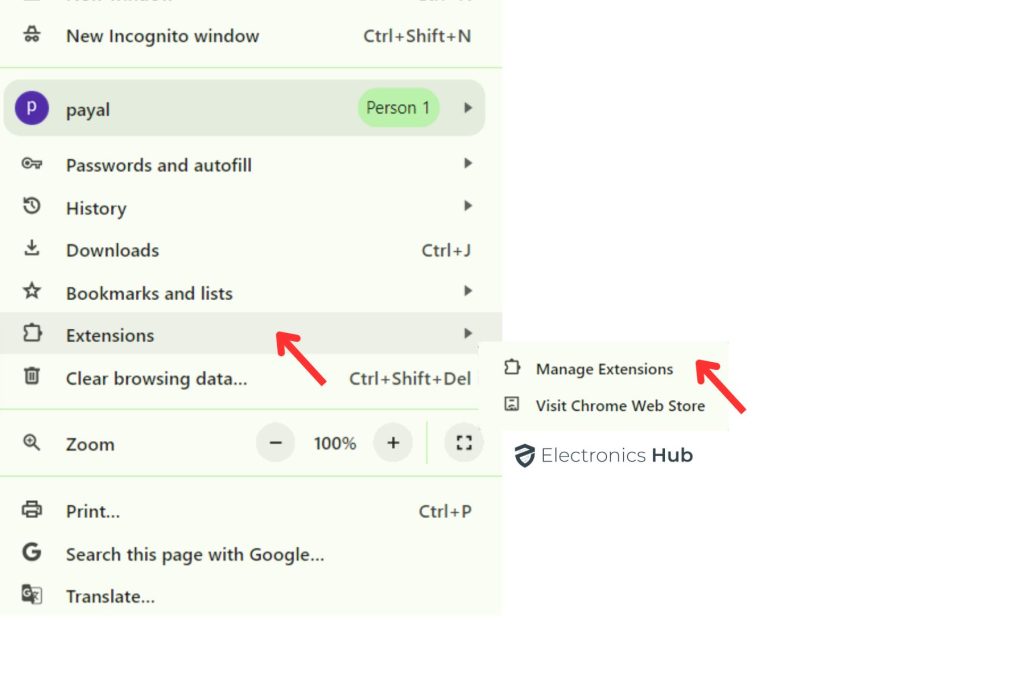
In the Extensions tab, you’ll see a list of installed extensions. Remove the extensions one by one by confirming click “Remove.” Mozilla Firefox:
- Open Firefox and click on the three horizontal lines in the top-right corner.
- Select “Add-ons” from the menu.
- In the Add-ons Manager, go to the “Extensions” panel. Disable or remove the extensions by clicking “Disable” or “Remove.”
Microsoft Edge:
- Open Edge and click on the three dots in the top-right corner.
- Choose “Extensions” from the menu.
- In the Extensions pane, you’ll see a list of installed extensions. Disable or remove them by toggling the switch off or clicking “Remove.”
Safari:
- Open Safari and click on “Safari” in the top menu.
- Select “Preferences” and go to the “Extensions” tab.
- Disable or uninstall extensions by unchecking the box next to “Enable” or click “Uninstall.
9. Reinstall the Chrome Browser
Uninstalling and reinstalling Google Chrome can help resolve the “ERR_CONNECTION_REFUSED” error by ensuring a fresh installation with correct settings. Here are the steps:
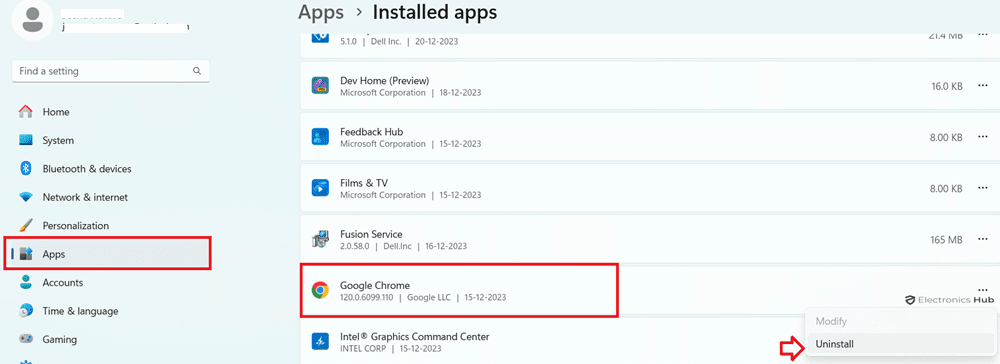
Uninstall Google Chrome:
- Go to settings
- Select Apps
- Find Google Chrome and tap on it and select Uninstall.
10. Change Your DNS Address
- Open settings and select “Open Network & Internet settings.”
- Select “Properties.”
- In the TCP/IPv4 Properties window, choose “Use the following DNS server addresses.”
- Enter the preferred DNS server address and alternate DNS server address. Common options include Google’s DNS (8.8.8.8 and 8.8.4.4) or Cloudflare’s DNS (1.1.1.1 and 1.0.0.1).
- Select Ok Option.

Conclusion
Now, if you’re dealing with the ERR_CONNECTION_REFUSED error in Google Chrome, it simply means your browser is having trouble connecting to a website. Figuring out why this is happening can be a bit tricky, so we’ve put together a guide with simple solutions to help you get things working again.
Our guide breaks down the common causes of the ERR_CONNECTION_REFUSED error and provides easy fixes. We hope this guide helps you quickly identify and solve the problem. If you have any questions or need more help, just drop a comment – we’re happy to assist you!
[adinserter block=”3″]
Credit : Source Post